In summary:
- Mastering the French trail marking system (GR, GRP, PR) is non-negotiable for navigation.
- Your packing list must prioritize non-obvious items like tick removal kits and whistles for children.
- Wildlife safety in France is less about large animals and more about a strict bio-security protocol against ticks and vipers.
- Regional rules, like summer fire-risk closures in Provence, dictate when you can legally hike and are not just suggestions.
- Choosing a trail for children requires balancing physical effort with sensory engagement, where forests often outperform coastal paths.
The idea of exploring a sun-dappled French forest or a dramatic coastal path with your family is idyllic. But as a mountain search and rescue volunteer, I know the reality that often follows that dream. Too many families venture out, armed with little more than a water bottle and misplaced confidence. They assume a two-hour hike is just a “walk” and that all trails are created equal. The common advice—pack essentials, check the weather—is not wrong, but it’s dangerously incomplete for the unique French environment.
You might hear about packing the “ten essentials,” but this often misses the specific risks you’ll face here. It’s not bears or mountain lions that pose a threat; it’s the tiny tick hiding in tall grass or the legal notice you can’t read closing a trail due to fire risk. The difference between a wonderful memory and a rescue call isn’t about having the most expensive gear; it’s about knowledge.
This is where we shift our perspective. The key to safety isn’t a longer packing list, but a smarter one. It’s about developing a situational awareness system tailored specifically to France. This guide will not just tell you *what* to do; it will explain the *why* behind the rules of the trail. We will decode the local marking system, identify the gear that actually matters for a short family hike, and implement a bio-security protocol against the real local dangers. This is the briefing you should have before you take your first step.
This article provides the essential framework for that system. We will cover the specific codes of French trails, the non-obvious gear you need, real wildlife risks, and how to choose the right path for your family’s capabilities. Let’s ensure your adventure is memorable for all the right reasons.
Summary: A Rescuer’s Guide to Safe Family Hiking in France
- Yellow, Red, or Blue: Decoding French Hiking Markers for Foreigners
- The 3 Items Most Families Forget to Pack for a 2-Hour Hike
- Ticks and Vipers: How to Protect Your Children in French Forests?
- Coastal Path or Forest Loop: Which Is Easier for a 5-Year-Old?
- Why Starting Your Hike at 8 AM Changes Everything in Provence?
- Natura 2000 vs National Parks: Which Designation Guarantees True Wilderness?
- Sand vs Paved: Which Bike Tires Do You Need for Forest Trails?
- Why the Pink Granite Coast Is the Most Underrated Luxury Destination?
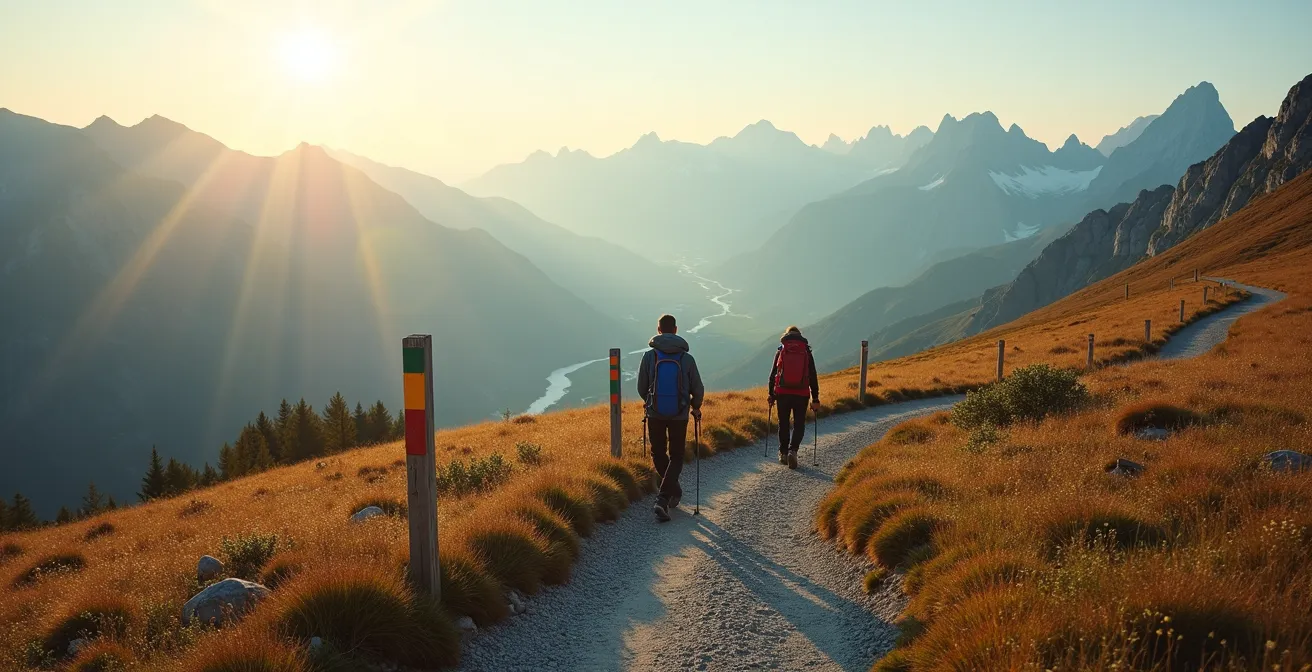
Yellow, Red, or Blue: Decoding French Hiking Markers for Foreigners
Your single most important safety tool on a French trail is not a GPS, but the ability to read the painted stripes on trees and posts. The French system, or balisage, is consistent nationwide but can be confusing if you don’t know the code. Believing “all trails are marked” without understanding this language is a primary reason people get lost. France maintains over 227,000 km of marked paths, and knowing the code is your key to navigating them.
This is the first layer of your situational awareness system. The markers tell you more than just where to go; they tell you what kind of journey you’re on.
- GR (Grande Randonnée): White and red stripes. These are long-distance trails crossing entire regions or the country. If you see these, you’re on a serious path.
- GRP (Grande Randonnée de Pays): Yellow and red stripes. These are regional loops, often taking several days to complete, exploring a specific territory.
- PR (Promenade et Randonnée): A single yellow stripe. This is your most common marker for local, shorter day hikes—perfect for families.
Beyond the colors, look for the symbols. A right-angle turn in the stripe indicates a sharp turn on the path ahead. An “X” in the same colors means “Wrong Way”—do not proceed. Ignoring this is a critical error. Teaching your children to spot the “good stripe” and the “bad X” turns navigation into a game and adds another layer of safety.

As the image shows, these markers are your lifeline. They are a clear, simple language painted onto the landscape. Before you go, take a picture of a guide to the markers on your phone. When you arrive at a trailhead, study the main map board, which will always show the markings used on the local loops. Do not start hiking until you have confirmed the color you are supposed to be following. This simple habit is the foundation of self-sufficient navigation.
Understanding this visual language transforms you from a tourist into a competent navigator. It’s the difference between blindly following a path and making informed decisions at every junction.
The 3 Items Most Families Forget to Pack for a 2-Hour Hike
When you read a standard hiking checklist, it’s filled with items for surviving a night in the wilderness. For a short family hike in France, this is overkill and leads to people packing nothing at all. The key is not to pack for a catastrophe, but to pack for the most probable risks. From my experience, families don’t forget water or snacks; they forget the small, specific items that solve the most common problems on French trails.
These are not “nice-to-haves”; they are essential components of your risk management. The most significant oversight is failing to prepare for minor medical and separation scenarios. Forgetting these means a small incident can quickly escalate.
- A Proper Tick Removal Kit: Not your bathroom tweezers. You need fine-tipped tweezers or a specialized tick-remover tool designed to pull a tick out cleanly without squeezing its body. Given that research shows 2-3 times more tick bites in children aged 0-5, this is the most important medical item you will carry.
- Individual Whistles for Each Child: A whistle is louder than a child’s voice and the sound carries much farther. Teach them that it’s an “emergency phone,” to be blown in three short bursts if they can no longer see you. It’s a simple, cheap tool that is incredibly effective at preventing a brief separation from becoming a full-blown search.
- High-Energy, Low-Weight “Morale” Food: Beyond your planned snacks, pack a small bag of something your kids truly love and rarely get, like specific candies or dried fruit. When a child’s energy and morale suddenly crash—a common occurrence—a five-minute break with this “magic” snack can completely turn the hike around and prevent a tantrum-induced standstill miles from the car.
These items fit into a small pocket and address the most frequent and predictable issues families face: minor injuries from bio-risks, momentary separation, and sudden energy crashes. They are the definition of a smart, targeted approach to safety.
Thinking in terms of probable events rather than worst-case scenarios allows you to pack light but remain exceptionally well-prepared for the reality of a family walk in the woods.
Ticks and Vipers: How to Protect Your Children in French Forests?
The concept of “dangerous wildlife” in Europe is often misunderstood. Your concern shouldn’t be large predators, but small organisms that can cause significant harm. In France, this means focusing your energy on a robust bio-security protocol against ticks and, to a lesser extent, vipers. Ticks are a widespread and serious health risk, as they can transmit Lyme disease and other pathogens.
The threat is not confined to deep wilderness. Data from the Signalement Tique program showed that while 49% of reported tick bites occurred in forests, a startling 23% happened in private gardens. This proves that vigilance is required in almost any natural setting. Vipers (vipères) are also present, especially in southern France. They are shy and will not attack unless surprised or cornered. The protocol for both is based on prevention and awareness.
Preventative Measures on the Trail
Your first line of defense is clothing and behavior. Have everyone wear light-colored clothing to make ticks easier to spot. Tuck long trousers into socks, especially for children who are closer to the ground and more likely to brush against tall grass, the prime habitat for ticks. Stay on the marked paths as much as possible. When it comes to vipers, the key is to make noise. They sense vibrations through the ground, so walking with a firm step is usually enough to warn them of your approach. Instruct children never to reach into holes, under rocks, or into dense bushes.
Now that you understand the risks, you must have a clear, non-negotiable procedure to follow after every single outing in nature. This isn’t optional; it’s a critical safety habit.
Your Post-Hike Bio-Security Checklist
- Immediately upon returning home, place all hiking clothes directly into a dryer on high heat for 10 minutes. This will kill any ticks before the clothes are even washed.
- Conduct a full-body tick check on every family member. Use a hand-held mirror to inspect hard-to-see areas. Pay extremely close attention to the scalp, hairline, behind the ears, armpits, groin, and behind the knees.
- If you find an attached tick, use your fine-tipped tweezers to grasp the tick as close to the skin’s surface as possible. Pull upward with steady, even pressure. Do not twist or jerk.
- After removing the tick, thoroughly clean the bite area and your hands with rubbing alcohol or soap and water. Circle the bite area with a pen and monitor it for several weeks for any signs of a rash.
- For vipers, the primary action is prevention. If a bite occurs, keep the person calm and still, and call emergency services (112) immediately. Do not apply a tourniquet or attempt to suck out the venom.
This systematic approach removes fear and replaces it with competent, calm action, ensuring that your encounters with nature remain safe and positive.
Coastal Path or Forest Loop: Which Is Easier for a 5-Year-Old?
Choosing a trail for a young child is more complex than just looking at distance and elevation. A flat, “easy” trail can be mentally exhausting, while a slightly more varied one can be engaging and feel shorter. I call this the Effort vs. Engagement Ratio. A 5-year-old’s stamina is tied directly to their level of interest. The common debate between a coastal path and a forest loop is a perfect example of this principle in action.
On paper, a flat coastal path seems easier. But in practice, the repetitive terrain, exposure to sun and wind, and monotonous views can drain a child’s energy and enthusiasm quickly. A forest, by contrast, offers constant sensory input: strange roots, interesting insects, changing light, and things to touch. This engagement significantly offsets the physical effort.
The following table breaks down the key differences through the lens of a young child’s experience. It helps you move beyond simple difficulty ratings and make a more strategic choice for your family’s success.
| Factor | Coastal Path | Forest Loop |
|---|---|---|
| Surface difficulty | Sand is tiring, rocky sections | Dirt paths easier for small feet |
| Sun exposure | Limited shade, heat stress risk | Natural canopy protection |
| Engagement level | Views but monotonous | Varied sensory stimulation |
| Safety concerns | Cliff edges, strong winds | Getting lost if straying |
| Rest opportunities | Beaches for breaks | Fallen logs, clearings |
As you can see, the forest often wins for younger children. The shaded canopy protects them from the sun, the softer ground is kinder to small feet, and the constantly changing environment keeps their minds occupied. While the risk of getting lost is higher if you stray from the path, your knowledge of the marking system mitigates this. A coastal path can be spectacular, but it may be better suited for slightly older children or for shorter sections where you can easily access a beach for a long break.
By prioritizing engagement, you are not just choosing a trail; you are actively managing your child’s energy and ensuring the experience remains fun for everyone.
Why Starting Your Hike at 8 AM Changes Everything in Provence?
In many parts of the world, starting a hike early is a matter of comfort—beating the heat or the crowds. In the south of France, particularly in Provence and along the Côte d’Azur during summer, it’s a matter of legal compliance and safety. This is a critical part of the unwritten “French Trail Code” that many foreign visitors dangerously overlook. The risk of forest fires (risque d’incendie de forêt) is so extreme that authorities legally restrict access to the hills and forests, known as massifs.
Every day during the high-risk season (typically June to September), the local prefecture publishes a color-coded map indicating the level of fire danger. On days with high wind (the Mistral) and dry heat, access can be completely forbidden (coded as Black) or, more commonly, restricted after a certain time, often 11 AM or noon (coded as Red). Hiking in a restricted area is illegal and puts you and the emergency services at immense risk.
Case Study: The 11 AM Rule in the Massifs
Many popular hiking areas in Provence, like the Calanques, the Massif de l’Esterel, or the Sainte-Baume, are subject to strict summer access rules. As documented by multiple hiking authorities, access is dictated by the official ‘carte de risque incendie de forêt’ published daily. On “Red” risk days, entry is often only permitted from 6 AM to 11 AM. An 8 AM start gives you a three-hour window. A 10 AM start gives you only one. This makes an early start not just a good idea for comfort, but essential for legal and safe trail access.
An early start has other benefits too. Wildlife, including vipers, is less active in the cooler morning hours. You also avoid the peak activity times for ticks, which are most active in temperatures between 10-25°C. By the time the day reaches this optimal temperature range, you are already well on your way back. Starting at 8 AM isn’t just a tip; it’s a fundamental rule for safe summer hiking in southern France. Always check the daily fire risk map for the department you are in before even driving to the trailhead.
What is a suggestion elsewhere is a hard-and-fast rule here, and knowing the difference is what keeps you safe.
Natura 2000 vs National Parks: Which Designation Guarantees True Wilderness?
When planning a hike, you’ll often see areas designated as a “National Park” (Parc National) or a “Natura 2000” site. It’s easy to assume these labels are interchangeable, all promising a pristine, wild experience. This is a misconception. Understanding the difference is crucial for planning, as the rules governing your activity—and the “wild” feeling of the place—can differ dramatically.
A French National Park has a highly protected “core zone” (cœur de parc) where conservation is the absolute priority. Human activity is strictly limited to preserve the natural state. This means rules are rigid and enforced. Conversely, the Natura 2000 network is a European designation aimed at protecting specific habitats and species *while coexisting with human activities* like farming, forestry, and recreation. The regulations are far more flexible and managed locally.
For a family hiker, this translates into very practical differences. A National Park might offer perfectly maintained trails and stunning, untouched landscapes, but with a list of prohibitions. Natura 2000 sites can feel more authentically “lived in” and less regulated, but also wilder and with less infrastructure.
This table highlights the practical implications for your hike planning. There is no “better” option; the right choice depends on the experience you’re looking for.
| Aspect | National Park Core Zone | Natura 2000 |
|---|---|---|
| Dogs allowed | Usually prohibited | Generally permitted on leash |
| Camping | Strictly forbidden | Depends on local rules |
| Human activities | Minimal, strict conservation | Coexists with farming/forestry |
| Trail maintenance | Regular, controlled access | Variable by local management |
| Wilderness feel | Preserved but can be crowded | Less regulated, more authentic |
It allows you to select a location that aligns with your expectations, whether you’re seeking pristine but regulated beauty or a more rugged and flexible adventure.
Sand vs Paved: Which Bike Tires Do You Need for Forest Trails?
While this guide focuses on hiking, many families explore French forests on two wheels. The question of “which tires” is common, but it’s the wrong first question. The right question is “which bicycle type is appropriate for the trail surface?” The tires come with the bike. In France, rental shops will offer two main options for forest exploration: the VTC and the VTT.
Understanding this distinction is key to a safe and enjoyable ride. Most maintained French forest trails are pistes forestières—hard-packed dirt or gravel roads. They are not technical single-track mountain paths. This surface is what should guide your choice.
- VTC (Vélo Tout Chemin): This is a hybrid bike. It has wider, more robust tires than a city bike but is not as heavy-duty as a mountain bike. It’s the perfect tool for 90% of family-friendly forest trails in France. Its tires are designed for gravel, dirt roads, and short paved sections.
- VTT (Vélo Tout Terrain): This is a true mountain bike, with thick, knobby tires, and often suspension. A VTT is necessary only for trails specifically marked as “sporty” (Red) or “technical” (Black), which involve steep inclines, roots, and rocks. Using a VTT on a simple forest road is overkill and will be slower and more tiring.
When you go to a rental shop, don’t ask for specific tires. Describe your plan. Simply saying, “un VTC pour une balade facile sur les chemins” (a hybrid bike for an easy ride on the paths) will get you the right equipment. Most rental locations near forests are well-versed in the local trail conditions and will provide the appropriate bike. Always ask them about the trail difficulty colors: Green (very easy/family), Blue (moderate), Red (sporty), and Black (expert). For a family outing, stick to Green and Blue.
Selecting the VTC for a typical forest path ensures a comfortable, efficient, and safer ride, allowing you to focus on the scenery, not on wrestling with the wrong equipment.
Key takeaways
- Your primary safety tool is knowledge: learn the French trail marking system (PR, GR, GRP) before you leave.
- A targeted safety kit (tick remover, whistles) is more effective than a generic “essentials” list for short family hikes.
- Implement a non-negotiable post-hike “Bio-Security Protocol” focusing on tick checks to manage the most realistic health risk.
Why the Pink Granite Coast Is the Most Underrated Luxury Destination?
After discussing rules, risks, and protocols, it’s important to remember the reward. When all elements of the situational awareness system come together, the result is a seamless, stress-free experience that feels truly luxurious. The Pink Granite Coast (Côte de Granit Rose) in Brittany is a perfect case study of this principle in action. It’s not a luxury destination because of five-star hotels, but because its infrastructure makes safe, spectacular family hiking incredibly accessible.
The “luxury” here is the absence of friction. You can walk out of your accommodation in towns like Ploumanac’h or Perros-Guirec and step directly onto one of the most beautiful coastal paths in Europe. The trail is well-maintained, relatively flat, and impossible to get lost on, making it perfect for a multi-generational family group.
Case Study: The GR34 on the Pink Granite Coast
The famous GR34 coastal path runs the length of the coast. Here, it is marked with the classic white and red Grande Randonnée stripes, managed by a network that, across Brittany, includes over 15,000 licensed hikers and 230 associations. This intense level of care results in a clear, safe path. The route winds through spectacular rock formations, with cafes, crêperies, and public beaches providing frequent and motivating rest stops for children. It perfectly balances high engagement with manageable physical effort.
This destination exemplifies the successful application of our principles. The marking system is clear (GR34). The risks are easily managed (coastal path with good visibility). The effort-to-engagement ratio for children is phenomenal. It proves that with the right knowledge and preparation, you don’t need a professional guide to access world-class natural beauty safely. The confidence that comes from this competence is the ultimate luxury.
By applying the safety systems outlined in this guide, you transform yourself from a passive tourist into an active and capable explorer, ready to unlock the incredible experiences the French countryside has to offer.